The Vibe Coding Bible
The complete guide to building software with AI.
Learn the patterns. Master
the prompts. Ship quality code.

Code like a Developer. Design like an Artist. Ship like a Founder.
What kind of founder are you?
The Zero to One Guide
Welcome! If you think "Terminal" is a disease or "Python" is a snake, this is for you.
Code is a Recipe. The Computer is the Chef.
You (the coder) write the recipe. The Chef follows it exactly. If you forget to say
"turn on the oven," the Chef waits forever.
You are not early to a trend. You are early to mastering it.
The Landscape: Builders vs. Editors
There are two ways to build software with AI today. It's important to know the difference.
1. The "Builders" (Lovable, v0, Bolt)
The Analogy: Ordering Takeout 🥡
You tell them what you want ("A spicy burger"), and they hand you the finished meal instantly. It's magic.
- Pros: Insanely fast. Zero setup. Visuals first.
- Cons: Hard to "change the recipe" later. If you want to change the foundation, you're stuck.
- Verdict: Perfect for prototypes and validating ideas quickly.
2. The "Editors" (Cursor, Claude Code)
The Analogy: The Ultra-Modern Kitchen 🔪
You are still the Head Chef, but you have a robot sous-chef who chops, stirs, and cooks at
100x speed. Cursor handles your frontend in real time. Claude
Code handles your backend with full codebase awareness. Put your standards in
CLAUDE.md (or similar) so both stay aligned.
- Pros: Infinite control. You own the code. Scalable, production-grade software.
- Cons: You need to know what a "knife" is.
- Verdict: This is how you build a career and ship real products. This book focuses here.
How to Use This Guide
Difficulty Levels
| Icon | Level | Description |
|---|---|---|
| 🟢 | Beginner | Start here if you're new |
| 🟡 | Intermediate | Requires foundation knowledge |
| 🔴 | Advanced | For experienced developers |
Learning Paths
🚀 Path A: Complete Beginner
Start at Chapter 1, work through in order, do
every
exercise.
⚡ Path B: Know Some React
Skim Chapters 1-2, focus on State Management and
Performance.
🎯 Path C: Quick Reference
Jump to appendices, use Glossary for unfamiliar
terms.
Part I: Getting Started
1. The Vibe Coding Mindset
🟢 Beginner | Prerequisites: None
Vibe coding is building software by collaborating with AI—describing what you want, reviewing what it produces, and guiding it toward better solutions.
TIP: The best vibe coders aren't the best typists—they're the best communicators.

You Are the Architect, AI Is the Builder
| Aspect | Description |
|---|---|
| What | You decide WHAT to build and HOW it should work. AI handles implementation. |
| Why | AI writes fast but doesn't know your users, constraints, or standards. |
A film director doesn't operate the camera, but decides every shot. You are the director; AI is the camera operator.
The Three Laws of Vibe Coding
Law 1: Garbage In, Garbage Out
Vague prompts produce vague code. Be specific.
❌ VAGUE
"Make a button"

✅ SPECIFIC
"Make an accessible button with loading state and size variants (sm, md, lg)"
Law 2: Trust but Verify
AI confidently produces broken code. It PREDICTS,
doesn't
KNOW. Always test.
Law 3: Iterate, Don't Regenerate
When code isn't right, tell AI specifically
what's wrong. Don't start over.
1a. The ARC Method
Architect. Refine. Construct.
The most effective way to build software with AI is to use the right model for the right stage of development. I call this the ARC Method: Architect, Refine, Construct.
Draws the blueprints. Best for high-level planning, system design, and architecting your backend before a single line gets written. Claude Code—with Claude Opus 4.6—reads your codebase, understands dependencies, and plans at the level of an actual senior engineer.
Refines the blueprints into working frontend. With full codebase context and inline AI editing, Cursor translates architecture decisions into production-quality UI—component by component, without losing the thread of the overall design.
Keeps the build honest. Codex 5.4 runs automated code review on every commit—catching logic errors, security gaps, and regressions that slip through when you are moving fast. The guardrail that lets you ship with confidence.
The House Building Analogy
Just as you wouldn't ask a bricklayer to design a skyscraper, you shouldn't use one tool for every stage of the build. Each tool is optimized for a different kind of thinking.
- 👉 Claude Code (Opus 4.6): Draws the blueprint and builds the structure.
- 👉 Cursor: Finishes the interior—every room exactly as designed.
- 👉 Codex 5.4: The inspector who checks the work before you hand over the keys.
API_CONTRACT.md,
TYPES_CONTRACT.md, and STATE_CONTRACT.md—are the blueprints all three
work from. Claude Code writes them. Cursor reads them. Codex 5.4 flags when code diverges from
them. See the Contract File System (Chapter 1b) for the full
workflow.
Agent-first workflows (2026)
Beyond chat tabs, teams wire Claude Code (Opus 4.6), Cursor, and Codex 5.4 like the ARC roles above—then lock it in with tests and your context files.
Anthropic's coding agent in your terminal, powered by Claude Opus 4.6:
explores the tree, edits files, runs commands, and follows CLAUDE.md
project rules.
OpenAI's cloud coding agent (Codex 5.4) for end-to-end tasks across a codebase—pair it with ChatGPT in the browser for planning and layered review.
1b. Context Files
🟢 Beginner | Prerequisites: Chapter 1a
Give your AI a long-term memory.
A new employee reads the handbook on day one—culture, standards, unwritten rules. Context files are that handbook for your AI. Without them, every session is day one forever.
Every new AI session starts with zero memory of your project. Context files fix that: markdown files in your repo that tools load automatically so the model gets your stack, standards, and goals every time.
The three files to know
| File | Tool | Purpose |
|---|---|---|
CLAUDE.md |
Claude Code (Opus 4.6), Cursor | Project rules, stack, naming, what not to do |
AGENTS.md |
Agentic tools (many vendors) | Permissions, workflows, off-limits paths |
GEMINI.md |
Gemini CLI, AI Studio | Same idea as CLAUDE.md for Google's toolchain |
CLAUDE.md starter template
Drop this in the project root and customize. Specific beats vague.
# Project Context

## Stack
- Framework: Next.js (App Router)
- Language: TypeScript (strict)
- Styling: Tailwind CSS
- State: [Zustand / TanStack Query / etc.]
- Database: [your DB]
- Auth: [your provider]

## Code standards
- Components: functional only
- File naming: kebab-case files, PascalCase components
- Always handle loading and error states
- No `any` — use `unknown` and narrow
- Prefer named exports

## What NOT to do
- No `useEffect` for server data — use a data library
- Do not install packages without asking
- No comments that only restate the code
- No inline styles unless agreed

## Architecture
- UI primitives → `/components/ui/`
- Features → `/components/features/` (or `/features/`)
- API clients → `/lib/api/`
- Shared types → `/types/`

## Tone
- Code should read like documentation
- Prefer explicit over clever
AGENTS.md starter (permissions)
# Agent Instructions

## Permissions
- You MAY read and edit files in `/src/`
- You MAY run `npm test` and `npm run build`
- You MAY NOT modify `/public/` without confirming first
- You MAY NOT commit directly to `main`

## Workflow
1. Before generating code: re-read the relevant files in context
2. After generating code: run lint and type-check
3. If uncertain: ask before acting, not after

## Off-limits
- Never touch auth-related files without explicit instruction
- Never modify `.env` files
- Never delete files — move to `/archive/` instead
The Contract File System
How to keep Claude Code and Cursor in sync across backend and frontend.
When an architect and a contractor build a house together, they don't just talk—they both work from the same signed blueprints. If the architect moves a wall, they update the blueprint. The contractor works from the current blueprint, not from memory of a conversation. Contract files are those blueprints.
The hardest problem in a multi-tool AI workflow isn't getting one tool to build something well—it's keeping two tools aligned on the same system. Claude Code builds your backend. Cursor builds your frontend. Without a shared source of truth, they drift. An API endpoint gets renamed. A type changes shape. A field gets added. One tool knows. The other doesn't. That's how bugs get born.
Contract files solve this. They're .md files that define the exact interface between
backend and frontend—written once, committed to the repo, and referenced by both tools before
they touch anything that crosses that boundary.
The three contract files
| File | What it defines | Who reads it |
|---|---|---|
API_CONTRACT.md |
Every endpoint: method, path, request shape, response shape, error codes | Claude Code (writes) + Cursor (reads) |
TYPES_CONTRACT.md |
Shared TypeScript types and interfaces used on both sides of the stack | Both—neither adds a shared type without updating this first |
STATE_CONTRACT.md |
Global state shape, store structure, what the frontend can expect to exist | Cursor (reads) + Claude Code (writes when state is server-driven) |
The workflow
When a new API route or shared type is created, Claude Code updates
API_CONTRACT.md or TYPES_CONTRACT.md as part of the same
task. Not after. Same task. The contract is part of the deliverable, not an
afterthought.
Every Cursor session that touches an API call or shared type starts with the contract
in context. Paste it in, or reference it in your CLAUDE.md. Cursor builds
to the spec—not to assumptions.
If the backend changes an endpoint, the contract gets updated first. Cursor gets the updated contract before it touches any affected frontend code. The contract is the handshake—both sides agree to it before building.
The API_CONTRACT.md template
# API Contract
Last updated: [date]
Backend: Claude Code | Frontend: Cursor

---

## Authentication

### POST /api/auth/login
**Request:**
```json
{
  "email": "string",
  "password": "string"
}
```
**Response (200):**
```json
{
  "user": {
    "id": "string (uuid)",
    "email": "string",
    "name": "string",
    "role": "admin | member"
  }
}
```
**Errors:**
- 401: Invalid credentials → `{ "error": "INVALID_CREDENTIALS" }`
- 429: Rate limited → `{ "error": "RATE_LIMITED", "retryAfter": number }`

**Auth:** None required
**Notes:** Session set via httpOnly cookie on success. No token in response body.

---

## Users

### GET /api/users/:id
**Request:** None
**Response (200):**
```json
{
  "id": "string",
  "email": "string",
  "name": "string",
  "createdAt": "ISO 8601 string"
}
```
**Errors:**
- 404: User not found → `{ "error": "USER_NOT_FOUND" }`

**Auth:** Required (session cookie)
**Notes:** Returns only public-safe fields. Never returns passwordHash.
The TYPES_CONTRACT.md template
# Types Contract
Last updated: [date]
Source of truth for all shared types between backend and frontend.
Both Claude Code and Cursor must reference this before creating or
modifying any type used across the stack boundary.

---

## Core Domain Types

```typescript
// User — used in auth, profile, and permission checks
interface User {
  id: string         // UUID
  email: string
  name: string
  role: 'admin' | 'member'
  createdAt: string  // ISO 8601
}

// API response wrapper — all endpoints return this shape
interface ApiResponse<T> {
  data: T | null
  error: string | null  // error code string, not user-facing message
}

// Pagination — used on all list endpoints
interface PaginatedResponse<T> {
  items: T[]
  total: number
  page: number
  pageSize: number
  hasMore: boolean
}
```

---

## Change Log
| Date | Change | Who |
|------|--------|-----|
| 2026-04-10 | Added `role` field to User | Claude Code |
| 2026-04-08 | Added PaginatedResponse | Claude Code |
| 2026-04-07 | Initial types | Claude Code |Where these files live
project-root/
├── CLAUDE.md              ← Project rules + stack (Claude Code reads this)
├── AGENTS.md              ← Agent workflow rules
├── API_CONTRACT.md        ← Endpoint specs (Claude Code writes, Cursor reads)
├── TYPES_CONTRACT.md      ← Shared types (both tools read and write)
├── STATE_CONTRACT.md      ← Store shape (Claude Code writes, Cursor reads)
├── PROMPTS.md             ← Architecture decisions log
└── src/
    ├── app/               ← Frontend (Cursor)
    └── api/               ← Backend (Claude Code)
All contract files live at the project root—same level as your context files. They're committed to the repo and version-controlled. When a contract changes, the git diff tells you exactly what shifted between backend and frontend. That's your audit trail.
Directors use a production bible—tone, references, in/out of scope. Your context file is the production bible for your AI; every session shoots from the same playbook.
✏️ Exercise: Write your first CLAUDE.md
- Open your project root
- Create
CLAUDE.md - Fill in stack, three standards you care about, two “never do” rules
- Open a new AI session and ask: “What stack are we using?”—it should quote your file
2. Prompt Engineering
🟢 Beginner | Prerequisites: Chapters 1–1b
The quality of AI-generated code depends entirely on how you ask.
The 5 Parts of a Great Prompt
| Part | Question | Example |
|---|---|---|
| 1. Context | What's the situation? | Next.js 16 with TypeScript |
| 2. Task | What do you want? | Create user profile component |
| 3. Requirements | What constraints? | Accessible, typed, handles errors |
| 4. Format | How should output look? | One component per file |
| 5. Examples | What pattern to follow? | Like our Button component |
The self-review prompt
After the model generates code, ask it to review its own work. Critique mode catches issues generation mode skipped—the task changed from “produce” to “audit.”
A chef tastes before service. Tasting is a different mode than cooking; your model behaves the same way.
❌ STOP HERE (common mistake)
"Build me email + password authentication."
[AI generates code]
[You ship]

✅ ADD THIS AFTER
"Now review the code you just generated. Check for:
- Security issues (especially password/session handling)
- Edge cases that are not handled
- Types that could be tighter
- Anything that would fail in production
What would you change?"The creative latitude unlock
Add this to the end of meaty feature prompts to shift from “execute the spec” to “senior collaborator”—you will get accessibility, loading states, and guardrails you forgot to list.
Add to the end of your prompt:

"You're free to add any functionality you think will be necessary or
valuable for this feature. Use your judgment."| Without it | With it |
|---|---|
| Exactly the button you described | Button + focus states + loading + error feedback |
| Plain form markup | Validation, debounced submit, inline errors |
| Minimal API route | Sanitization, correct status codes, basic abuse protections |
Directions: "Go to store" might work. "Take Main St north 2 miles, turn right at red barn" definitely works. Prompting is giving clear directions.
🥋 The Prompt Dojo (Try it yourself)
See the difference between a lazy prompt and a Vibe prompt.
Part II: Foundations
3. Philosophy
🟢 Beginner | Prerequisites: Chapters 1-2
These principles guide every coding decision. Internalize them to spot problems instantly.
The 7 Principles
- Clarity > Cleverness: Readable beats impressive
- Explicit > Implicit: Obvious beats magical
- Composition > Inheritance: Small pieces beat hierarchies
- Colocation: Related code stays together
- Deletion > Abstraction: Simple beats flexible
- Performance by Default: Fast is a feature
- Accessibility Always: Build for everyone
1. CLARITY over cleverness
Recipes: "Chop onions finely" beats "Apply blade to allium at decreasing intervals." Clear code is like a clear recipe.
// ❌ CLEVER BUT CONFUSING
const r = a?.b?.c ?? d?.e ?? "default"

// ✅ CLEAR AND READABLE
const userCity = user?.address?.city
const defaultCity = settings?.defaultCity
const city = userCity ?? defaultCity ?? "Unknown"Prompt
What you get
Which principle says small, composable pieces beat deep inheritance trees?
Law 3 of Vibe Coding says that when output is wrong, you should…
4. Architecture
🟢 Beginner | Prerequisites: Chapter 3

Next.js App Structure
A well-organized kitchen: utensils near stove, plates near dishwasher. If you can't find a file in 5 seconds, your kitchen is messy.
src/
├── app/                    # Routes (pages)
│   ├── page.tsx            # Home page (/)
│   ├── about/
│   │   └── page.tsx        # About page (/about)
│   ├── dashboard/
│   │   ├── page.tsx        # Dashboard page
│   │   └── layout.tsx      # Dashboard layout
│   └── layout.tsx          # Root layout
├── components/
│   ├── ui/                 # Primitives (Button, Input, Card)
│   └── features/           # Feature components (UserCard, ProductList)
├── hooks/                  # Custom React hooks
├── lib/                    # Utilities and helpers
│   ├── api/                # API client functions
│   └── utils/              # Helper functions
└── types/ # TypeScript type definitionsPrompt
What you get
Which folder typically holds route segments in the App Router?
Reusable Button, Input, and Card components usually live in…
5. TypeScript
🟡 Intermediate | Prerequisites: Basic JavaScript, Chapter 4
TypeScript catches bugs before runtime. Enables autocomplete. Serves as documentation.
Spell-check for code: It won't write your essay for you, but it catches "teh" before you submit. It prevents silly mistakes.
Discriminated Unions
Hospital wristband: The color (discriminant) tells staff exactly what care protocol applies. TypeScript knows the shape based on the 'status'.
type AsyncState<T> =
  | { status: "idle" }
  | { status: "loading" }
  | { status: "success"; data: T }
  | { status: "error"; error: Error }

function handleState(state: AsyncState<User>) {
  if (state.status === "success") {
    console.log(state.data.name)  // ✅ TypeScript knows data exists!
  }
}
6. Naming Conventions
🟢 Beginner | Prerequisites: Chapters 3-4
Road signs: A hexagon means STOP. The shape alone tells you everything. Consistent naming reduces cognitive load.
| Convention | Use For | Examples |
|---|---|---|
| PascalCase | Components, Types | UserProfile, ButtonProps |
| camelCase | Variables, functions | userName, useAuth |
| kebab-case | Files, folders | user-profile/, api-client.ts |
| SCREAMING_SNAKE | Constants | API_URL |
7. React Components
🟡 Intermediate | Prerequisites: Basic React, Chapter 5
LEGO bricks: Each brick has a specific shape and purpose. You combine simple bricks to build complex castles. Change one brick, update it everywhere.
Component Structure Order
1️⃣ TYPES          interface Props { ... }
2️⃣ COMPONENT      export function Name({ props }) {
3️⃣ HOOKS          const [state] = useState()
4️⃣ DERIVED        const fullName = first + last
5️⃣ HANDLERS       const handleClick = () => { }
6️⃣ EARLY RETURNS  if (loading) return <Skeleton />
7️⃣ RETURN return ( <div>...</div> )Prompt
What you get
What is the recommended order for structure inside a component file?
For clickable actions, you should prefer…
Part III: Intermediate
8. State Management
🟡 Intermediate | Prerequisites: Chapter 7
Restaurant order pad: Tracks orders, updates when customers change their mind, and determines what the kitchen cooks. Without state, the app is just a static menu.
State Hierarchy
| Priority | Type | Use Case | Tool |
|---|---|---|---|
| 1 | URL State | Shareable | searchParams |
| 2 | Server State | API Data | TanStack Query |
| 3 | Form State | User Input | React Hook Form |
| 4 | Local UI | Component only | useState |
| 5 | Global UI | Many components | Zustand |
9. Styling
🟢 Beginner | Prerequisites: Basic CSS, Chapter 7
We use Tailwind CSS for utility-first styling.
Paint-by-numbers: Instead of mixing your own colors (writing custom CSS), you pick from a curated palette of pre-defined classes. Fast and consistent.
Class Order Convention
Layout → Sizing → Spacing → Typography → Colors → Borders → Effects → States
// ✅ ORGANIZED - follows order
className="flex p-4 text-white font-medium bg-blue-600 rounded-lg hover:bg-blue-700"
10. Performance
🟡 Intermediate | Prerequisites: Chapter 8
1-second delay = 7% fewer conversions.
The Buffet: Code splitting is like a buffet—let users take only what they want (load chunks on demand), rather than forcing them to eat everything on the menu at once.
Code Splitting
import { lazy, Suspense } from "react"

const Dashboard = lazy(() => import("./pages/Dashboard"))

function App() {
  return (
    <Suspense fallback={<LoadingSkeleton />}>
      <Dashboard />
    </Suspense>
  )
}
Part IV: Advanced
11. Accessibility
🟡 Intermediate | Prerequisites: Chapter 7
Building ramps: Ramps help wheelchairs, but they also help parents with strollers and delivery carts. Accessible code improves the experience for everyone (including SEO robots).
The #1 Rule: Use Semantic HTML
// ❌ NEVER - not accessible
<div onClick={handleClick}>Click me</div>

// ✅ ALWAYS - accessible by default
<button onClick={handleClick} type="button">Click me</button>
12. Error Handling
🟡 Intermediate | Prerequisites: Chapters 5, 8
Trapeze Safety Net: The show goes on even when someone slips. Good error handling catches the fall so the application doesn't crash completely.
Every async operation has THREE states. Handle ALL of them: Loading, Error, Success.
Prompt
What you get
try/catch or toast—often no loading state,
no empty state, no retry path.Every async user-facing operation should account for which states?
Letting errors bubble with no UI usually…
13. Security
🔴 Advanced | Prerequisites: Chapters 5, 8, 12
Locking doors: Most people won't break into your house, but the cost of leaving the door unlocked is too high. Don't leave tokens in localStorage (the front porch).
The #1 Rule: Never Store Tokens in localStorage
// ❌ NEVER - JavaScript can access, XSS can steal
localStorage.setItem("token", authToken)

// ✅ ALWAYS - JavaScript cannot access
cookies().set("session", authToken, {
  httpOnly: true,      // JS can't read this cookie
  secure: true,        // HTTPS only
  sameSite: "lax",     // CSRF protection
})
Vibe coding: security rules that need a human
The five manual review gates
Have a human verify these areas before production. Models often produce plausible-looking auth and payment code that fails under attack.
| Area | What to check | Common AI mistake |
|---|---|---|
| Authentication | Token storage, session expiry, logout | JWT in localStorage (XSS) |
| Authorization | Every protected path enforced server-side | Client-only checks; APIs left open |
| Payments | Prices computed server-side | Trusting client-sent amounts |
| Error messages | Generic to users; detail in logs only | Leaks existence of accounts, stack traces |
| Secrets | No secrets in client bundles or git | Prefixing secrets with NEXT_PUBLIC_ |
// Security review checklist — before deploy

□ JWT/session in httpOnly cookie (or equivalent), not localStorage
□ API routes verify auth server-side, not only middleware
□ Prices, roles, entitlements from DB — not from the client
□ User-facing errors are generic; logs hold detail
□ No secret keys exposed via NEXT_PUBLIC_
□ Input validated and sanitized on the server
□ Rate limits on auth endpoints
□ No console.log of PII in production
13a. SEO & AEO Best Practices
🟡 Intermediate | Prerequisites: Chapter 4
In the age of AI search engines (Perplexity, ChatGPT, Google's SGE), optimizing for both traditional SEO and Answer Engine Optimization (AEO) is critical.
SEO is like a library catalog—it helps people find your book. AEO is like a librarian—it reads your book and answers questions directly. You need both.
1. Semantic HTML Structure
Use proper HTML5 semantic elements. Search engines and AI crawlers understand structure.
// ❌ BAD - Div soup
<div class="header">...</div>
<div class="content">...</div>

// ✅ GOOD - Semantic HTML
<header>...</header>
<main>
  <article>
    <section>...</section>
  </article>
</main>
<footer>...</footer>
2. Heading Hierarchy (H1 → H6)
One H1 per page. Use headings in order (don't skip H2 to H4). This creates a clear content outline.
// ✅ CORRECT STRUCTURE
<h1>Main Title</h1>
  <h2>Section</h2>
    <h3>Subsection</h3>
      <h4>Sub-subsection</h4>
3. Meta Tags (The Foundation)
| Tag | Purpose | Example |
|---|---|---|
<title> |
Page title (50-60 chars) | "The Vibe Coding Bible | AI Guide" |
meta description |
Search snippet (150-160 chars) | "Complete guide to building software with AI..." |
meta keywords |
Relevant terms (comma-separated) | "AI coding, Cursor AI, Vibe Coding" |
og:image |
Social sharing image (1200x630px) | hero_vibe_bible.png |
canonical |
Prevent duplicate content | <link rel="canonical" href="..."> |
4. Structured Data (Schema.org)
JSON-LD structured data helps AI engines understand your content. Use it for:
- Book/Course: Educational content
- FAQPage: Common questions (critical for AEO)
- HowTo: Step-by-step guides
- BreadcrumbList: Navigation structure
// Example: FAQPage Schema (Perfect for AEO)
<script type="application/ld+json">
{
  "@context": "https://schema.org",
  "@type": "FAQPage",
  "mainEntity": [{
    "@type": "Question",
    "name": "What is Vibe Coding?",
    "acceptedAnswer": {
      "@type": "Answer",
      "text": "Vibe coding is building software..."
    }
  }]
}
</script>
5. AEO-Specific Optimizations
Traditional SEO optimizes for keywords. AEO optimizes for questions and answers. AI engines want to extract direct answers from your content.
Best Practices for AEO:
- Answer Questions Directly: Start paragraphs with direct answers. "Vibe Coding is..." not "In this section, we'll explore..."
- Use Q&A Format: Include FAQ sections with clear questions and concise answers.
- Define Terms Early: Define key concepts in the first paragraph.
- Use Lists and Tables: AI engines extract structured data easily from lists.
- Include Context: Explain "why" not just "what". AI engines value comprehensive explanations.
6. Image Optimization
| Requirement | Why | Implementation |
|---|---|---|
| Descriptive alt text | Accessibility + Image search | alt="Vibe Coding Bible Book Cover" |
| Proper file names | SEO signal | hero-vibe-bible.png not IMG_1234.png |
| Optimized file size | Page speed (ranking factor) | Use WebP, compress images |
| Width/Height attributes | Prevent layout shift | width="1200" height="630" |
7. Performance = SEO
Google and AI engines prioritize fast-loading sites. Core Web Vitals matter:
- LCP (Largest Contentful Paint): < 2.5s
- FID (First Input Delay): < 100ms
- CLS (Cumulative Layout Shift): < 0.1
// Optimize images
<img
  src="hero.png"
  alt="Description"
  loading="lazy"           // Lazy load below fold
  width="1200"
  height="630"
  decoding="async"          // Non-blocking decode
/>

// Preconnect to external domains
<link rel="preconnect" href="https://fonts.googleapis.com">
8. Mobile-First & Responsive
Mobile-first indexing is standard. Ensure your site works perfectly on mobile devices.
<meta name="viewport" content="width=device-width, initial-scale=1.0">

// Test with Chrome DevTools Mobile Emulation
// Ensure touch targets are at least 44x44px
9. Content Quality (The #1 Ranking Factor)
No amount of technical SEO beats great content. Write for humans first, optimize for engines second. If your content answers questions comprehensively, both Google and AI engines will rank it.
Content Checklist:
- ✅ Comprehensive (1000+ words for main pages)
- ✅ Original (not copied from elsewhere)
- ✅ Updated regularly (freshness signal)
- ✅ Well-structured (headings, lists, tables)
- ✅ Answers user intent (not just keywords)
10. Internal Linking
Link related content together. This helps both users and crawlers understand your site structure.
// ✅ GOOD - Contextual internal links
<p>Learn more about <a href="#prompt-engineering">Prompt Engineering</a>.</p>

// ❌ BAD - Keyword stuffing
<p>Click here for <a href="#prompt-engineering">prompt engineering prompt engineering</a>.</p>
11. robots.txt & Sitemap
Create a robots.txt file to guide crawlers:
# robots.txt
User-agent: *
Allow: /

Sitemap: https://vibecodingbible.com/sitemap.xml
Generate and submit a sitemap.xml to Google Search Console and Bing Webmaster Tools.
12. The AEO Checklist
| Check | Status |
|---|---|
| FAQPage schema implemented | ✅ |
| Questions answered in first paragraph | ✅ |
| Definitions provided early | ✅ |
| Structured data (JSON-LD) present | ✅ |
| Content is comprehensive (1000+ words) | ✅ |
| Lists and tables used for clarity | ✅ |
| Internal linking structure clear | ✅ |
| Mobile-responsive design | ✅ |
| Page speed optimized (<3s load) | ✅ |
| Alt text on all images | ✅ |
PRO TIP: Test your AEO optimization by asking Perplexity or ChatGPT: "What is [your topic]?" If your content appears in the answer, you're doing it right.
Part V: Case Studies
14. Task Manager
🟢 Beginner | Prerequisites: Chapters 1-7
Build a complete task manager while learning to direct AI effectively.
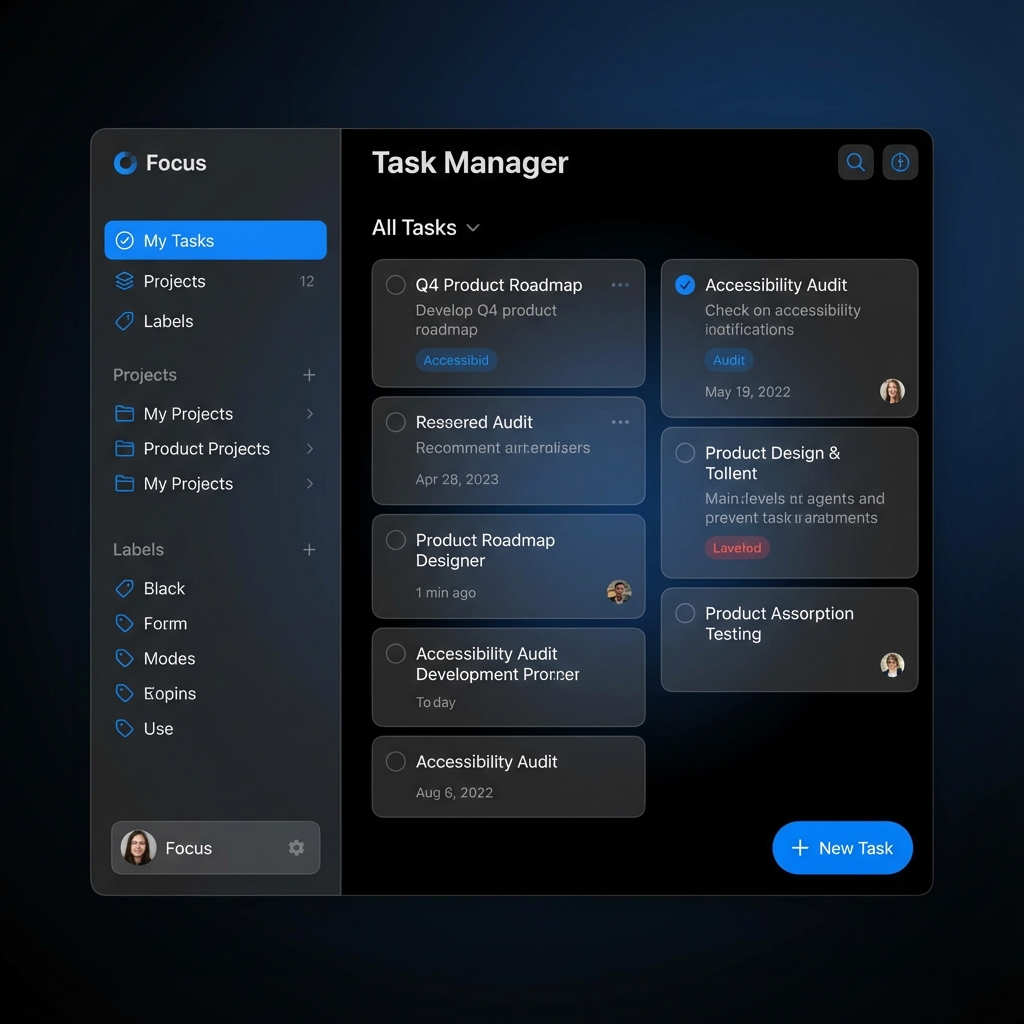
Before a chef cooks (codes), they organize ingredients (data) and tools (components). We don't just "start coding." We prep.
Step 1: The Blueprint (Data)
First, we define what a "Task" actually is. Don't guess; tell AI.
"I want to build a Task Manager.
First, generate a TypeScript interface for a 'Task'.
It should have: id, title, isCompleted, createdAt, and priority (low, medium, high)."Prompt
What you get
Step 2: The Components (Tools)
Next, we build the visual pieces. Remember the LEGO analogy.
"Create a 'TaskItem' component.
Props: taking a single 'Task' object and 'onToggle' function.
Style: Use Tailwind. If priority is high, give it a red border.
Accessibility: Ensure the checkbox has an aria-label."
Step 3: The Logic (Cooking)
Now we bring it to life. This is where state lives.
The 'App' component is the Brain (holds the list). The 'TaskItem' is the Hand (displays one task). The Hand tells the Brain "I was clicked," and the Brain updates the list.
"Create the main 'TaskList' component.
1. Use 'useState' to hold the array of Tasks.
2. Create a function 'toggleTask(id)' that finds the task and flips its 'isCompleted' status.
3. specific requirement: Don't mutate state directly; use .map()."
Step 4: Refinement
Finally, we polish. Ask AI to "Add a filter for Active/Completed tasks" only AFTER the basic list works.
Before building TaskItem, what should you lock in first?
When toggling completion, why avoid mutating the tasks array in place?
15. Weather Dashboard
🟡 Intermediate | Prerequisites: Chapters 1-8

Your browser is the user. The API is a hotel in Tokyo. You can't just shout at Tokyo. You need a Travel Agent (The Fetch Function) to go get the info and bring it back safely.
Step 1: The Contract (Types)
Before flying, we agree on what to bring back. If we expect "temp" but get "temperature", the app crashes.
It checks the luggage (data) on arrival. If it's suspicious (wrong type), it rejects it immediately.
"Create a Zod schema for the Weather API response.
It should confirm that we are receiving a 'main' object with a 'temp' number, and a 'weather' array with a description string."
Step 2: The Service (Travel Agent)
Now write the function that actually travels.
"Write a function 'getWeather(city)' that fetches from the API.
1. Use the Zod schema from Step 1 to parse the response.
2. If the response is 404 (City Not Found), return null.
3. If the network fails, throw a specific 'NetworkError'."
Step 3: The View (Display)
Create the dashboard UI assuming you *already have* the data.
"Create a 'WeatherCard' component.
Props: taking a parsed 'WeatherData' object.
State: None (Pure component).
Display: Temperature in large text, description in capitalized text."
Step 4: Integration
Paste that into Cursor, Claude Code (Opus 4.6), or Codex 5.4 and iterate.
Next Step: Once you are ready for real components, use the Component Template in the Vibe Library.
"Create the main Page.
1. Add a Search Input.
2. When the form submits, call 'getWeather'.
3. While waiting, show a 'SkeletonLoader' (Optimistic UI).
4. If 'getWeather' throws, show a red Error Banner."
16. E-commerce Page
🔴 Advanced | Prerequisites: All previous chapters
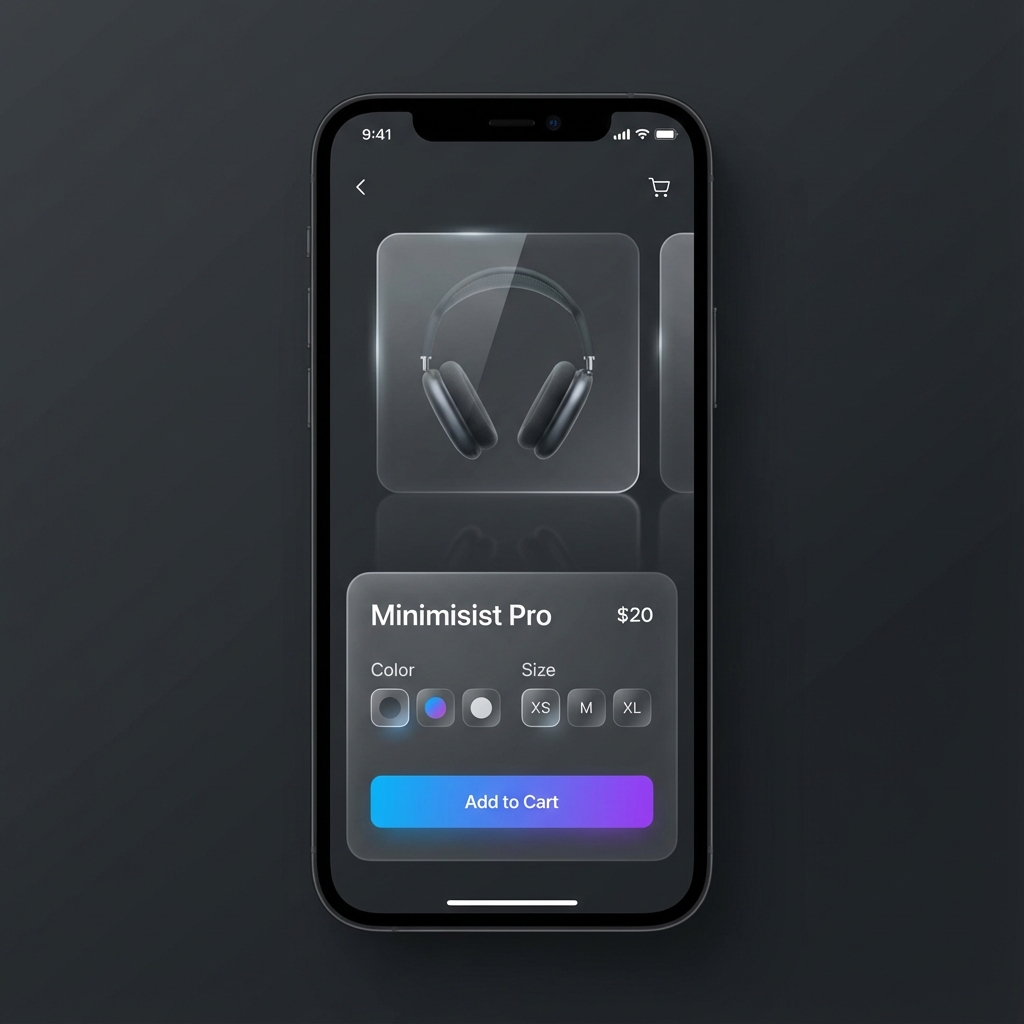
A "T-Shirt" isn't a product. "Red T-Shirt Size M" is the product. Handling these combinations is the hardest part of e-commerce.
Step 1: The Product Model
We need a data structure that allows for "Product" (the parent) and "Variants" (the children).
"Create 3 interfaces:
1. Product (id, title, basePrice)
2. Variant (color, size, sku, stockLevel)
3. CartItem (product + selected variant + quantity)"
Step 2: The Global Cart (Context)
The Cart is like a physical shopping cart that follows you around the store.
Even if you leave the page, the cart should remember. We use `localStorage` to keep the ghost alive.
"Create a 'CartProvider' using Zustand.
1. persist: Save to localStorage automatically.
2. actions: addItem, removeItem, updateQuantity.
3. logic: If adding same SKU, increment quantity, do not duplicate item."
Step 3: The Product Page Strategy
Now build the page where the decision happens.
"Create a 'ProductConfigurator' component.
Props: product and all variants.
1. User selects Color -> Filter available sizes.
2. User selects Size -> Calculate final price and stock status.
3. If variant is OOS -> Disable 'Add to Cart'."
Step 4: Performance Guardrails
E-commerce is heavy on images. Slow images = lost sales.
"Optimize the product page:
1. Use next/image with 'priority' on the main hero image.
2. Use 'sizes' prop to serve smaller images on mobile.
3. Memoize the variant calculation function so it doesn't run on every render."
Vibe Coding for Designers
You are no longer just "Drawing Rectangles." You are the Architect of the Code.
Figma is the Promise. Code is the Delivery.
Traditionally, you promised a beautiful UI, and developers delivered a broken one. Vibe
Coding gives you the truck. YOU deliver the UI.
1. Setting up your stack (Cursor & Claude Code)
Turn design intuition into shipped UI: Cursor for screens, Claude Code when you need the whole repo.
Step 1: The Setup
Install Cursor for a VS Code–style editor with inline AI—ideal for layout, components, and polish. Add Claude Code when you want a terminal agent with full codebase awareness (and optional ChatGPT Codex 5.4 for review automation).
- Install: Download from cursor.com
- Extensions: Install "ES7 React/Redux/GraphQL" and "Tailwind CSS IntelliSense".
- Privacy: Turn on "Privacy Mode" if working on NDA projects.
Step 2: The 3 Best Practices
Don't just say "Fix this." Open the relevant file (cmd+p) so the AI sees what you see. The AI triggers off what is open.
Don't try to write the loop. Describe the outcome: "Make a grid of cards that wraps on mobile." Use your designer vocabulary.
If the button is wrong, don't delete it. Type: "Make the padding bigger." Treat the AI like a junior designer sitting next to you.
2. Setting up the Figma Bridge (MCP)
Don't just look at Figma. Let the AI *read* it. Connect your design directly to code.
| Tool | Setup Instructions |
|---|---|
| Cursor |
|
| Claude Code |
Configure the Figma MCP server in your environment (same endpoint as above) so Claude Code can read frames and variables—check the latest Claude Code docs for MCP setup. |
3. The Foundation: Design Systems
The AI needs a dictionary to understand your constraints. Don't let it guess colors.
Figma Variables → Tailwind Config
"Here is my Design System config. Use ONLY these values:
- Primary Color: #019bd8 (cyan accent)
- Surface Color: rgba(31, 31, 36, 0.72) (glass)
- Spacing: 4px base unit (p-1 = 4px, p-4 = 16px)
- Radius: 12px for cards, 99px for buttons"
4. Translating "Auto Layout" to Code
Your "Auto Layout" settings map 1:1 to CSS Flexbox. Speak the language.
| Figma Setting | CSS / Tailwind Logic | The Prompt |
|---|---|---|
| ➡️ Direction: Horizontal | flex-row | "Align items in a row." |
| ↕️ Direction: Vertical | flex-col | "Stack items vertically." |
| ⏹️ Gap: 16px | gap-4 | "Add 16px gap between items." |
| ↔️ Hug Contents | w-fit | "Width should fit the content." |
| 🛑 Fill Container | flex-1 / w-full | "Take up all remaining space." |
Think of <div>s as Frame Layers. Just like you group layers in Figma
to handle layout, you group elements in code.
5. Motion & Interaction (The Vibe)
Don't just say "animate it." Give the developer the physics.
The "Apple" Glide
cubic-bezier(0.25, 0.1, 0.25, 1)
The "Spring" Pop
type: spring, bounce: 0.5
The "Glass" Fade
backdrop-filter + opacity
The "Punch" Click
scale(0.95) active
*Interact with these cards to feel the difference.
Describing the Physics:
Static comps don't show the vibe. You must describe the feel.
"Add a hover effect to the cards.
1. Scale up slightly (1.02)
2. Add a soft glow (shadow-lg)
3. TIMING: Use a 'spring' physics feel, not linear. Duration ~300ms.
4. CSS: transition-all duration-300 ease-out"
6. Real World Workflow (Example)
Stop manually copying CSS. Use the Figma MCP Server as described in step 2 to let Cursor read your file.
- Step 1: Select the Frame in Figma. Copy the Link.
- Step 2: Go to Cursor. Type
@figmaand paste the link. - Step 3: Prompt: "Implement this card exactly. Use my Tailwind config. Pay attention to the Gradient Boarder."
7. Troubleshooting Visual Bugs
When the AI gets it wrong (it will), don't say "It looks bad." Be specific.
❌ Bad Feedback: "The button is wrong."
✅ Vibe Feedback: "The padding on the button is too tight. Increase horizontal padding to 24px (px-6) and ensure it's vertically centered."
Part VI: Shipping Your Vibe
17. The Captain's Tools (Before You Ship)
🟢 Beginner | Prerequisites: None
To ship software, you need to leave the safety of the text editor and enter the engine room.
1. The Terminal (The Command Line)
Using a mouse is like pointing at a menu in a restaurant. It's easy, but limited to what's on
the page.
The Terminal is like texting the Chef directly. You can order things that
aren't on the menu, faster and with more precision.
Common commands you'll use:
cd(Change Directory) = "Walk into this room."ls(List) = "Look around. What's in here?"npm install= "Go shopping for ingredients."
2. NPM (Node Package Manager)
You don't grow your own wheat to make a sandwich. You buy bread.
NPM is the grocery store for code. Instead of writing a Date Picker from
scratch (growing wheat), you `npm install` one (buy bread). package.json is
your shopping list.
3. The Build Process
Your code is like your messy bedroom—clothes everywhere (comments, huge files, messy
formatting).
"Building" is folding everything perfectly into a small suitcase. The
computer removes spaces, shrinks images, and organizes files so they fly across the internet
instantly.
18. The Vault (Git & GitHub)
🟢 Beginner | Prerequisites: None
Before you ship, you must save. But "Cmd+S" isn't enough. You need insurance.
1. Git (The Time Machine) 🕰️
Imagine fighting a boss without saving. If you die, you restart the game.
Git creates "Save Points" (Commits). Before you try a crazy new feature
(The Boss), you commit. If you break the app, you just reload the save.
2. GitHub (The Cloud Beacon) ☁️
Git is the Camera (It takes the snapshot of your code on your
phone/laptop).
GitHub is Instagram (It's where you upload the photo for the world to
see/backup).
If your laptop burns down, your code lives forever on GitHub.
The Workflow:
1. git add .        (Stage the photo)
2. git commit -m "My Save" (Take the photo)
3. git push         (Upload to Instagram/GitHub)
19. Deployment (Opening Night)
🟢 Beginner | Prerequisites: A working app on localhost
Until you ship, you haven't built software. You've built a diary entry. It's time to show the world.
Localhost is Rehearsal. Deployment is Opening Night.
On localhost, you can stop, restart, and mess up. In production, the audience is watching.
The stage limits (server) might be different from your rehearsal room (laptop).
The Magic Button: Vercel / Netlify
In the Vibe Coding era, we don't buy servers. We push code.
The Golden Workflow:
1. Push your code to GitHub.
2. Connect complete repo to Vercel.
3. Vercel detects Next.js/Vite automatically.
4. Click "Deploy".
5. Receive a live URL (app.vercel.app).
⚠️ The #1 Trap: Environment Variables
If your app works locally but breaks online, it's 99% likely this.
Your .env file (API keys) sits on your laptop. It does NOT go to GitHub (security). You
must manually give these keys to Vercel in their "Settings > Environment Variables" menu.
The "It Works on My Machine" Checklist
| Item | Check |
|---|---|
| Build | Run npm run build locally. If it fails here, it fails there. |
| Keys | Are all API keys added to Vercel/Netlify Dashboard? |
| Logs | Check the "Build Logs" tab if it fails. The error is usually in red. |
The Final Polish: Custom Domains 🌐
An unwieldy URL like my-app-v82.vercel.app screams "student project." Here is how you
turn pro.
The Domain Workflow:
1. Buy domain (Namecheap/GoDaddy).
2. Go to Vercel Dashboard > Project Settings > Domains.
3. Type "vibecodingbible.com" and click Add.
4. Vercel gives you numbers (A Record: 76.76.21.21).
5. Go to your Domain Registrar -> DNS Settings -> Add A Record.
6. Wait 5 minutes (DNS Propagation).
7. 🎉 You are live.
Part VII: Advanced Patterns (2026)
20. The Vibe Wall
🔴 Advanced | Prerequisites: Prior chapters + real project experience
Every vibe coder hits it. Here is how to get through.
You are building a sandcastle; one more tower and the far wall collapses—even though you did not touch it. The Vibe Wall is when complexity outruns the model’s effective understanding: new changes work in isolation but break or duplicate existing behavior.
Warning signs
| Signal | What it usually means |
|---|---|
| Rebuilt components that already exist | Context is not covering the real structure of the repo |
| One fix, two new bugs | Hidden coupling not described in prompts or context files |
| Contradictory advice in one session | No single written source of truth for architecture |
| You cannot explain the codebase to another human | Stop shipping features; stabilize and document first |
| Prompts keep getting longer | You are compensating for missing project memory |
Four-step recovery protocol
Audit the tree. Example prompt: “Summarize every component in /src, what
it does, and what it depends on.” Rebuild shared understanding before new code.
CLAUDE.md / AGENTS.md.
Capture the architecture that evolved during the build—new modules, invariants, and things agents must not do.
One function, one component, or one route—not “build checkout,” but “the pricing function checkout calls.”
If recovery fails twice, bring in a human refactor pass. That is not failure—it is the 20% where precision beats speed.
// Before starting the next feature

□ Context files match the current architecture
□ Tests and build are green
□ Last commit is a known-good state
□ This task has a single sentence description
21. Prompt documentation (PROMPTS.md)
🟡 Intermediate | Prerequisites: Chapter 18 (Git)
Document the conversation, not just the code.
Commits say what changed; they rarely capture why you picked JWT over sessions. In vibe-led work, the prompt is the decision log—if you do not save it, the reasoning disappears.
Add PROMPTS.md at the repo root. Log prompts that drove architecture, security, or
tradeoffs—not every tweak.
# PROMPTS.md — architecture decision log

---

## Auth implementation
**Date:** 2026-04-10
**Tool:** Claude Code (Claude Opus 4.6)
**Prompt:**
> "Add email/password auth. JWTs in httpOnly cookies, not localStorage.
> Refresh rotation. 15-minute access token."

**Why:** XSS resistance — httpOnly cookies are not readable from JS.

**Issues after generation:**
- Generic errors leaked whether an email existed
- Fix: uniform "Invalid credentials" on all auth failures

**Files:** `/lib/auth.ts`, `/app/api/auth/route.ts`, `/middleware.ts`

---
Log vs. skip
| Log it | Skip it |
|---|---|
| Architecture (state, auth, schema) | Button color tweaks |
| Security-sensitive implementations | Typos |
| Decisions where you compared 2+ options | One-line utilities |
| Anything a new engineer would need explained | Routine CRUD |
22. Multi-agent review
🔴 Advanced | Prerequisites: Chapter 21, access to more than one model
Different models catch different bugs. Stack them on purpose.
A surgeon, risk manager, and patient advocate read the same care plan and notice different failure modes. Models disagree in productive ways—use that.
Three-layer review stack
| Layer | Typical tool | Role | Prompt framing |
|---|---|---|---|
| Generate | Claude Code (Opus 4.6) / Cursor | Ship the feature | Full spec + context file |
| Logic review | Fresh Claude Opus 4.6 session (or other) | Logic, edge cases, silent failures | “Senior engineer review—no style nits, only correctness risks.” |
| Security audit | Codex 5.4 / reasoning model (e.g. OpenAI o-series) / Gemini | Auth, validation, data exposure | “Security audit: inputs, authz, leakage, injection—severity + fix.” |
Self-review helps, but it is still one worldview. A second model often spots what the first assumed away—like proofreading your own essay.
// Layer 1 — Generate (Claude Code Opus 4.6 / Cursor)
[Feature prompt] + CLAUDE.md context

// Layer 2 — Logic review (new session)
"Review this file as a senior engineer. No style changes.
Focus on: logic errors, unhandled edge cases, unexpected null/undefined,
functions that can fail silently. Number each issue with line references."

// Layer 3 — Security (Codex 5.4 / other vendor or model)
"Security audit only: validation gaps, auth bypass, sensitive data in
responses/logs, injection. Tag HIGH/MED/LOW + concrete fix."
Optional: nightly automation
Advanced teams schedule diffs through a second model and post results to chat. Start manual; automate once the prompts are stable.
# .github/workflows/ai-review.yml (sketch)
name: Daily AI Code Review
on:
  schedule:
    - cron: '0 8 * * *'
jobs:
  review:
    runs-on: ubuntu-latest
    steps:
      - uses: actions/checkout@v4
      - name: Collect changed TypeScript
        run: git diff --name-only HEAD~1 HEAD -- '*.ts' '*.tsx' > changed.txt
      - name: Call review API + post to Slack
run: # your script + secretsAppendices
The Vibe Library (Templates)
Don't type from scratch. Paste these into Cursor, Claude Code (Opus 4.6), or Codex 5.4 as your starting point.
These prompts are "Golden" because they force the AI to handle errors, loading states, and types before it writes a single line of logic.
1. The "New Component" Prompt
Use this when creating any new UI element.
"Create a functional React component named [ComponentName].
Specs:
- Use Tailwind for styling (mobile-first).
- Props: [prop1, prop2, optional className].
- State: Handle [loading/error/success] states if applicable.
- Accessibility: Ensure semantic HTML and aria-labels.
- Structure:
  1. Define Interfaces
  2. Define Component
  3. Return JSX
  4. Export Default"
2. The "Data Fetcher" Hook
Use this for connecting to APIs. Never use raw fetch in components.
"Create a custom hook named use[Feature]Data.
Requirements:
1. Use 'swr' or 'react-query' pattern (simulated if needed).
2. Return { data, isLoading, error, mutate }.
3. Handle 404 and 500 errors explicitly.
4. Type the response data strictly with TypeScript interfaces."
3. The "Panic Button" (Bug Fixer)
When everything breaks, paste this.
"I am getting this error: [Paste Error].
Context:
- It happens when I [Action].
- I suspect it's related to [Guess].
Task:
1. Explain WHY it is happening (briefly).
2. Propose a fix that checks for null/undefined values.
3. Show me the purely corrected code block."
The "What If I Break It?" Zone
In video games, you save before a boss fight. In coding, you `git commit`. If things explode, you just revert. You cannot destroy the computer.
The Vibe Dictionary (No Jargon)
Developers love fancy words for simple things. Here is the translation.
| The Word | The Vibe (Analogy) | Plain English |
|---|---|---|
| Component | Lego Brick | A reusable UI piece (Button, Card). |
| Props | Settings / Inputs | Options you pass to a component (Color, Text). |
| State | Short-term Memory | Data that changes while using the app (Form input, Toggle is on/off). |
| API | The Waiter | The messenger that takes your order (request) to the kitchen (server) and brings food (data) back. |
| Deploy | Go Live | Putting your website on the internet so others can see it. |
| Terminal | Control Room | Where you type commands to tell the computer what to do directly. |
| Git | Save Game | A time machine. It saves versions of your code so you can undo mistakes. |
| Repo | Project Folder | Short for "Repository". It's just the folder where your code lives. |
The Vibe Builder (.cursorrules)
Don't settle for generic responses. Customize your AI's brain before you start.
💡 How to use these rules
- Create a file named
.cursorrulesin your project's root directory. - Copy the text above and paste it into the file.
- For Claude Code and many agents, mirror the same rules in
CLAUDE.mdorAGENTS.mdso terminal sessions inherit them—see Context Files. - Restart your AI editor (Cursor, Windsurf, etc.) to apply the new "brain".